
A Few Notes on Navigation
Dark Fall’s interface should be obvious but there are a few minor quirks with it. The main issue is that the cursor sometimes takes a few moments to change shape when it passes over a hotspot on the screen. So, you may sometimes miss a path or an item of interest because the cursor failed to change when you passed it over the location in question. I was stuck for quite a while in the game because I missed a key item and I suspect the cursor was the problem. So, if the cursor doesn’t seem to be behaving the way I say it should, just move it around a bit.
The Story So Far…
On the evening of April 29 you receive a late-night phone call from your brother; an architect currently involved in a renovation project for an old, abandoned hotel and train station. It seems the hotel is supposedly haunted; there are even a couple of “ghost hunters” there.
Well, now the ghost hunters have gone missing and it appears that your brother may be the next to disappear. So, you catch the next train to Dowerton to find out what you can.
Walkthrough
The Station Platform
If you follow the story, you will learn that quite a few people have disappeared in and around the hotel over the years, including seven people who vanished on the night of April 29, 1947. For reference, here are the important people to keep track of for the story.
Thomas Callum – The son of a local farmer, he was romantically involved with Betty Penfold. Was secretly staying in room 1D.
George Crabtree – The owner of the hotel. Amateur photographer and ghost hunter. Lived in room 3B, had a studio in 3F and a darkroom in the cellar.
Pete Crowhurst – Your brother. He was an architect surveying the site for a planned renovation. He was not staying in the hotel; instead he had set up his base of operations in the waiting room of the train station.
Nigel Danvers – One of the ghost hunters. He and his partner, Polly White, have set up their equipment in room 2D.
Matilda Fly – London actress, vacationing after a rather disastrous play. Stayed in room 2B.
Gloria Grable – Socialite who arrived in somewhat mysterious circumstances. That’s her car in the barn. Stayed in room 1E.
Arther Johnston – A local artist and friend of George Crabtree, he was killed in WWII. He had a studio in room 3A.
Betty Penfold – The daughter of Edith Penfold, she did various chores around the hotel and was also an accomplished musician. Was carrying on a secret relationship with Thomas Callum. Lived in room 3D.
Edith Penfold – Proprietress of the hotel. Lived in room 3E.
Timothy Pike – A young boy who vanished somewhere near the station.
Andrew Verney – An astronomer. Apparently lived in room 2E.
Polly White – The other ghost hunter. She and Nigel Danvers are working on their final project for a degree in “Alternative Sciences”.
After the opening cinematic ends you find yourself standing in the train tunnel. (How did we wind up in the middle of the tunnel? Odd place for the train to drop us off.) Anyway, someone has fortunately met us here so listen to what Timothy has to say then follow his directions down the tunnel. Don’t bother trying to find him; he isn’t quite there it seems. There is a newspaper lying on the ground about halfway down the tunnel and if you stop to read it you will get your first introduction to the mystery of the hotel. Just keep heading down the tunnel until you reach the station.
When you reach the station, turn right and go forward onto the platform. (Timothy continues to prompt you along the way through here.) Go forward again and turn right. Click on the door of the building in front of you to open it and go inside.
Once inside, click on the light you can see dimly in the upper-left part of the screen to turn it on. Click on the panels in the back to open them then click both switches to turn on the power. Turn around and click on the doorknob to exit the power shed.
Timothy will talk to you a bit more then leave. You are now on your own. (You can visit Timothy again and talk to him if you wish; he can give hints on how to solve several of the puzzles in the game if you get completely lost.)
Anyway, to the right there are a pair of restrooms. You can look around them if you like but there really isn’t any need to do so. (There is a piece of information available in one but we’ll see it again later so it isn’t essential to get now.) Instead, turn left and go forward to get back to the platform then turn right and go forward to get to the entrance to the station. Turn right and click on the door handle to go inside.
Turn to the right. There is a machine in front of you to the right, next to the stairs. Click on it for a closeup then click on the handle. It will dispense some coins. Click on them to add them to your inventory then back out of the closeup.
Now, ahead and to your left you should see a doorway. Click on it to go into the station office.
Straight in front of you is a desk. Click on it for a closeup and read the letter to see that the station has been abandoned. There is nothing else to see here so back out of the closeup. You can also look at the map of the rail system above the desk and a chalkboard on the wall to the right of it but neither are of any real interest.
Turn to the right to face a set of filing pigeonholes. Read the note attached to the wall to the left of the pigeonholes to see that the station has indeed been shut down. Click on the various documents in the pigeonholes to pick up some random bits of information about the last days of the station. About the only thing of interest is a mention of a missing boy named Timothy Pike. (Hmmm… I think we’ve found him.)
When you have finished reading through the memos, click on the lantern you should see sitting on top of the pigeonholes to pick it up and add it to your inventory. Then turn to the right and go forward to exit the office.
Turn to the right, go forward, then turn left. You should see a couple of pay phones in front of you. Click on the left phone for a closeup then click on the handset to pick it up. Select the coins from your inventory to activate the phone. Listen for a bit and eventually Nigel, one of the ghost hunters, will come on the phone. He rambles a bit but eventually tells you that he left a key in a silver teapot, but he can’t remember where. Ah well, I guess being dead can play tricks with your memory…
Hang up the phone, back out of the closeup and turn left. Go forward then turn right to face the waiting room. Click on the doorknob to go inside.
Straight in front of you is a fireplace. To the left of it there is an object on the ground and, if you examine it, you will find your brother’s (broken) cell phone. I guess that explains why he didn’t return any calls. Back out of the closeup, turn right to face a table then click on it for a closeup.
There are several items on the table and you can examine them if you wish but the only one of real interest is your brother’s PDA. Click on it to pick it up then click on the bottom right button to turn it on. Read through the files (the icon that looks like a sheet of paper in the middle) and e-mails (the filing cabinet icon). Most of the files give background information on the story but one of them gives an important bit of information. Read the fifth file item (click on the sheet of paper icon then the “5” at the top). This entry will tell you that your brother’s theodolite started acting strange when he pointed it at position 271 x 632. He will also mention an odd word which seems to have popped into his head at that time; “KARS”. Remember this word.
Read the rest of the files and e-mails if you wish then turn off the PDA (click on “quit”), put it down (click anywhere else on the table) then back out of the closeup. Turn right to face the door again and click on the knob to exit.
Back in the foyer, go forward to the stairs and up them. Turn right. The piece of paper on the ground in front of you is from Timothy and you can read it if you wish. Timothy hangs out on the bridge here (this “corridor” is a pedestrian bridge over the train tracks) and functions as an in-game hint system. If you go to a room where you are stuck then come straight to the bridge, Timothy will give you some hints on how to continue. Or, you could just keep reading this walkthru.
Anyway, go forward across the bridge, turn right then go down the steps to the train platform. Go forward again. You should see an electronic device to your right; this is the theodolite your brother mentioned. Click on it for a closeup then push the power switch to turn it on.
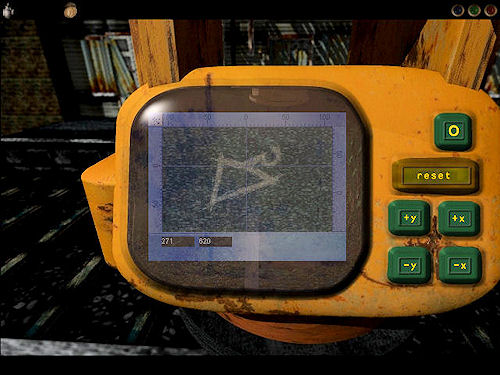
Now, use the +/- X and Y buttons to point the device at the coordinates you got earlier (271 x 632). When you get close (it doesn’t have to be exact) the screen will fill with static and an odd symbol will fade in and out. Note the symbol then turn the device off and back out of the closeup.
Go forward again. The stairs ahead of you lead into the hotel. We’ll be going there later so we’ll ignore it for now. Instead, turn to the left. Move the cursor around a bit and you should be able to find a path leading through the trees and into the woods (through the break in the fence). Follow this path. Go forward a second time then turn left and go forward to the front of a barn. Turn right to face the barn then click on the door to enter.
You can’t do much in the barn at first since it is dark so click on the lantern in your inventory. Go forward towards the car you see in the background then go forward again to walk around the car.
Turn left to face the car then examine the lower part of it to get a closeup of a hatch on the floor. Click on the hatch to open it and descend.
This next bit is somewhat tricky since you can only see by the light of your lantern. Go forward twice, turn left then go forward again. If you look around you should see a carved column and several rock pedestals. You can place your lantern on one of the pedestals (it’s to the right; click on it) and the room will be illuminated.
Notice the column in the background with various symbols on it and the one in the foreground with a row of holes carved in it. Examine the first hole on the top and you should get a closeup of a single symbol. Write down this symbol.
Now, look through all of the holes, starting at the topmost one, and write down the symbol you see through each hole. One of the symbols should look familiar; it is the same as the one you saw on the survey device. Since the word KARS is connected with this symbol, write that word down next to it.
Pick up the lantern again, turn around and find your way back to the barn. Back out of the closeup of the trap door then turn left to face the front of the barn.
You should be able to see a ladder and the barn door. Go towards the ladder and climb it. Turn right and click on the box on the table for a closeup. Click on the screwdriver in the box to examine it then click on it again to pick it up.
Back out of the closeup, turn right to face the ladder then go down. Turn around until you are facing the doors again and click on them to leave the barn. Make your way back through the woods until you reach the platform again. Turn right to face the pedestrian bridge. Go forward and through the bridge until you are back in the station foyer. Turn left to face the door then click on it to exit to the platform.
Turn right and go forward. You are now in front of the waiting room but this door is nailed shut. Go forward again to reach the hotel. Turn right to face the hotel door and click on the doorknob to enter. (The door is labeled “Buffet”. You can click on the window of the door to peek in before you go inside if you want.)
The Hotel – Ground Floor
You are now in the hotel buffet. (No, really.) You can examine a few of the tables here to get a closeup of some candles but you can’t do anything with them so just ignore them. Go forward once and turn left. Click on the shelves in front of you for a closeup then click on the device there to pick it up. This is an electromagnetic scanner which supposedly lets you know if there is a ghost in the area. I never found it to be of any particular use so just click the green button to “minimize” it to a fairly unobtrusive line on your screen.
Back out of any closeups then turn right. Click on the door in front of you to enter the hotel lobby. When you enter you will probably hear the phone ringing. Ignore it. (You can answer it if you wish but it doesn’t seem to have any importance. Sometimes you will hear a voice telling you to leave, other times you will hear random sounds and still others you will hear things like a time announcement. It seems to be random and easily ignored, even if you want to pick up on the story along the way.)
Go forward twice then turn left to face a desk. Click on the desk for a closeup. Answer the annoying ringing phone if you want.
Open the desk drawer. Click on the book near the center of the drawer to discover that it is a book about floods. Click through it until you get to a page with a note stuck in it. Click on the note to read it. Hmmm… Seems the police were interested in that car back in the barn. I wonder why?
Click through the rest of the book to put it back into the drawer. Now, click on what looks like an ad for flour in the right part of the drawer. It will slide to one side, revealing a card beneath it. Click on the card to examine it. Note the pattern you see. This is actually the combination for the safe you may have noticed earlier. Each set of dots represents a number from one to five, indicating how to open the safe. Note the ordering of the numbers then put everything back, close the drawer and back out of the closeup. (After you do, click on the calendar above the desk to note that April apparently only had 29 days back in 1947. Who knew?)
Turn to the left. There is a switchbox in front of you that you can examine if you wish but it doesn’t seem to have any function. Instead, go forward then turn completely around. Click on the safe for a closeup. See the cross-shaped slot with the lever in it? Click in the slot in the order indicated on the card from the desk to open the safe. (That’s left, top, middle, very bottom, right.) The safe will open. Click on the top shelf inside the safe to pick up the bar key. You can’t do anything with anything else in the safe so back out of the closeup. (If you make a mistake while entering the combination, back out of the closeup then examine the safe again to reset it.)
You should see another set of pigeonholes on the left. Click on the various documents in the holes to read them; this will give you some idea of who was staying in which room. Note that Matilda Fly and Gloria Grable had arranged a meeting of some type, George Crabtree had something planned and that someone has apparently been sneaking around the hotel.
Turn to the left and click on the blotter on the front desk for a closeup. Observe the pattern of ink spots on the blotter. Now, drag a sheet of paper from the left of the blotter onto the blotter itself. Click on the pen to the right of the blotter and a pattern of numbers will appear on the paper. (I’m not sure if we supposedly just took a rubbing of the numbers from the blotter or if one of the ghosts wrote the numbers. I assume it was a rubbing but…)
Now, drag the paper around a bit until some of the numbers line up with the cluster of ink spots near the center of the blotter. (The “2” near the bottom of the sheet should line up with the bottommost spot; other numbers should line up with the rest, starting with a “1” and the spot above and to the right of the “2”.) Sketch the arrangement of the spots, numbers and lines connecting them then back out of the closeup.
Turn to the left and click on the letter sitting on the desk to read it. Hmmm… Wonder where everyone went? Notice that George never came back from whatever it was he was planning; that probably isn’t a good sign. Put the letter away then go forward. Turn to the right to face the stairs. Now, there is more we can do down here but for efficiency’s sake we are going to start at the top of the hotel and work our way down; this lets us find most of the clues and solutions in the proper order. We’ll get back here eventually so don’t worry. But, for now, click on the stairs to climb partway up then click on them again to get the rest of the way to the first floor. (For those of you in the US who just got confused, in many parts of the world the “first” floor of a building is called the “ground” floor and the one above it is the first floor.)
Once on the first floor, click forward once then turn right to face the stairs again. Click on the stairs to climb to the second floor. When we arrive, go forward then wait for the spooky scene to finish. (As Count Floyd would say… “Ooooh… Scary!”)
When the scene is over, turn to the right and climb the stairs to the third floor. Go forward then click on the doorknob to open the door ahead of you. Go forward three times then turn right and click on the door to your left to enter the storeroom.
Click near the top of the ladder ahead of you to look up then climb the stairs to the attic. Whew! Now we can get started!
Hotel – The Attic
Go forward then turn to the right. Click on the valve to turn on the water heater. (Look in the small window on the side of the tank (lower right part of the screen) to make sure the heating unit is on. If a gas flame isn’t visible, click on the valve again then check again.) Now turn back to the right, go forward, then turn left. Examine the controls on the heater. Turn the valve under the first dial, wait until the needle on the dial enters the red zone, then push the lever to the left of the dials. This turns on the hot water to the first floor bathroom; we’ll be visiting it later.
Back out of the closeup, turn left twice then go forward. Turn right, go forward then turn right again. Examine the suitcase on the floor. Select the screwdriver from your inventory to insert it in the lock of the suitcase.
You now need to pick the lock of the suitcase using the screwdriver. Click above, below, left or right of the screwdriver to move it around. I never found anything to indicate how this should be done but trial-and-error eventually gave me left, right, left, right, down. The suitcase opens. Examine the contents and click on the book to pick it up. (The book is War of the Worlds.) You should see some pages sticking out the side of the book; click on them to read them.
What you find is a letter from George Crabtree that he apparently wrote shortly before meeting his fate. From the tone, it sounds like something Very Bad™ has happened. Looks like its up to us now.
When you finish reading the letter you will find a piece of paper with a symbol on it. You should recognize the symbol as one of the ones you saw on the stone column under the barn. You also get a note saying that the “lyric” for this symbol is “OLIVIAK”. Write that word next to the symbol on your list.
Close the suitcase and back out of the closeup. Turn right, go forward, turn left, go forward and examine the ladder. Go “forward” to climb back down to the storeroom.
(There is a Ouija board at the other end of the attic which we have bypassed. You can use it to talk to one of the ghosts in the hotel if you wish but it has nothing of importance to relate. If you want to see it, turn completely around when you get out of the closeup with the suitcase, go forward then turn left. Watch the “orb” fly by and light the candle. Click on the Ouija board for a closeup. Type in your questions and click “Say” to ask them and watch the answer. Be sure to say “goodbye” when you leave.)
Hotel – Third Floor
Once down, turn to the right twice then go forward. There are several notes stuck to the wall here. Click on the one on the left to read a note from Betty to her mother. Note Betty’s concern about someone in the hotel and pay particular attention to Betty’s complaint about her mother playing her music too loud. (Well, that’s different.) Look at the other notes if you want and you can look at a box of junk on the floor as well, though none of these are of real importance.
Back out of any closeups and turn to the right. You should see a teapot sitting on a shelf. Click on it twice, once for a closeup of the teapot then again for a view of the inside. Click on the key you see inside to pick it up; this is the key Nigel mentioned on the phone. Click on it again to add it to your inventory then back all of the way out of the closeups.
Go right, forward and right then click on the door to leave the storeroom. Turn right and click on the door to your right to enter the third floor bathroom.
Once inside, turn to the right twice to turn completely around. Notice the mirror; you can turn it to the left or right by clicking on its left or right sides. Turn it to the left until you see one of the lights reflected in the mirror. Now, turn to the left yourself. The light reflected on the wall should reveal several numbers. Click on the numbers for a closeup and write them down. When you have done so, back out of the closeup, turn back to the right and leave the bathroom.
Go forward once along the hallway and turn right. Click on the doorknob to enter room 3E; Edith Penfold’s room.
There are several things you can do here but only a few are important. First, click on the desk for a closeup then click on the drawer of the desk to open it. Now, click on the purplish book on the right of the drawer to pick it up. Click on the book to open it.
The book is a photo album. Click through it and read the notes to discover that Edith’s last vacation with her husband, Frank (who is apparently dead), was in Hastings. Close the book and the drawer then back out of the closeup and turn to the right.
Click on the top of the wardrobe for a closeup then click on the record album there to pick it up. Click on it again to turn it over. Notice that the second song on the album is “On Hastings Pier”. Put the album back down then back out of the closeup.
Now click on the phonograph. Click on the handle at the bottom to wind the phonograph up then click on the lower left switch to turn it on. Remember how the note we read from Betty complained of Edith playing her music too loud? Drag the switch on the right to the far right.
Finally, play the second song on the album by clicking on the second track. (Start with your cursor outside of the record and move it inward. Click when it changes to the pointing finger for the second time.) Now, back out of the closeup and turn to the left. You should see a picture fall from the wall. Click where the picture fell to examine it.
When you get the closeup, click on the picture to slide the back to one side. There are two pieces of paper hidden inside. One is another of those symbols from the column. The other is a letter from George to Edith. The letter explains a bit more of what is going on. It seems that George and his friend Arther (who is now dead, btw) accidentally disturbed something they shouldn’t have and have released something “evil”. The symbols and the words that go with them are somehow related to what they found and may be a means of destroying it. He tells Edith to keep the symbol and word safe and to not open the door to anyone.
The word for this symbol is “IXIAM” so write that one down on your list.
Back out of the closeups (and watch the picture magically return to the wall) then turn around and exit the room. The door across the hall is locked and we can’t get into it quite yet so instead turn to the right and go forward. There, turn to the right again and click on the doorknob to enter a sitting room.
There isn’t anything here that directly relates to solving the game but it does contain some story information. Click on the table you see in front of you then click on the book Ghosts, Myths & Legends of the Southwest. Click through it to read the story of Tom Oliver, a soldier who vanished during the British Civil War. You should realize that he vanished in what is now the hotel and, if you played with the Ouija board in the attic, you may have even spoken to him.
Back out of the closeup then turn to the right. Straight in front of you is a radio that you can tune around a bit though the music selection is somewhat limited. To the right there is a newspaper lying on a table. You can read it to find out more about the disappearance of Timothy Pike, who we have already met.
When you are done, turn to face the door and click on it to return to the hallway. Click on the doorknob of the door in front of you to enter room 3D; Betty Penfold’s room.
Once inside, turn to the left and go forward. Click on the trumpet you see in the lower center part of the screen for a closeup. There is what seems to be a piece of paper wrapped around it just ahead of the valves. Click on the trumpet a few times to rotate it until you can click on the paper. Note the five notes that Betty has circled. Write down the notes. (If you can’t read music and don’t want to copy the musical scale, the notes are G-G-A-B-C.) Back out of the closeup.
Now, click on the dresser for another closeup. Click on the metronome on the left. When it starts clicking, a letter will fade into view on the dresser. This is a letter from Betty to Thomas, who was apparently secretly staying elsewhere in the hotel. For some reason Betty and Thomas are trying to keep their relationship secret. It is implied that her mother may not approve of their being together but it really isn’t clear what is going on. Back out of the closeup when you are finished with the letter.
Turn to the left (you can examine the sheet music for “On Hastings Pier” on the wall here if you want) then turn left again. Go forward to the other end of the room then turn right and click on the doorknob to exit the room.
Turn left and click on the doorknob. The door will open and you will automatically go through. Turn to the right and click on the doorknob to enter room 3A; Arther Johnston’s studio.
There are quite a few things to do here but not all of them are relevant to the plot. You can examine just about everything in front of you if you want though none of it is necessary. (The man in the portrait seems to be George Crabtree, btw.) Instead, turn to the right to examine the back of the room. Click on the table to the left for a closeup. Click on the painting near the middle of the table. It will slide to one side revealing a sheet of paper. Click on the paper to pick it up and add it to your inventory.
Back out of the closeup then turn right to face the doorway. You should see a small stove to the left of the door. Click on the cups below the stove ( not on the stove itself) to get a closeup of the cabinet on which the stove is sitting. Click on the handle to open the cabinet.
There are a couple of things of interest here. First, click on the bottles on the top shelf to get a closeup of “Arther’s Magic Lemon Ink”. Back out of this closeup then click on the piece of paper you see under the pot on the middle shelf.
ZIGSVI. R GSRMP RG DLFOW YV DRHV GL DIRGV LFI IVXLIWH ZMW WIZDRMTH FHRMT BLFI RMERHRYOV RMP.
R WL MLG DZMG GSV LGSVIH GL PMLD LU LFI KOZMH QFHG BVG…
BLFIH GEORGE
ARTHER. I THINK IT WOULD BE WISE TO WRITE OUR RECORDS AND DRAWINGS USING YOUR INVISIBLE INK.
I DO NOT WANT THE OTHERS TO KNOW OF OUR PLANS JUST YET…
YOURS GEORGE
This is a note but it is in code. There is a (minor) hint to breaking the code elsewhere but it really isn’t that difficult.
Start by assuming this is a note to someone. (A good guess, given that it is signed “George”.) Now, assume the first word is the person to whom the note is addressed. This is six letters with the second and last letter the same. Now, we just saw a bottle labeled “Arther’s Magic Lemon Ink”. Arther is six letters with the second and last letter the same. So, assume Z=A, I=R, G=T, S=H and V=E. Substitute these letters into the note. From there it should be quite easy to proceed. It should quickly become obvious that the code is a simple substitution cipher where A=Z, B=Y, C=x, D=W and so on all the way back to Z=A.
The note says that George is worried that the “others” might find out what they are doing and suggests writing their records in invisible ink; presumably the “magic lemon ink” we just saw.
As some of you may already know, lemon juice can actually be used as invisible ink. Messages written in lemon juice can be made visible by applying heat. So, let’s try that.
Put the note away (if you haven’t already) then close the cabinet door by clicking on the handle. Click on the valve you should see to the right of the cabinet to turn on the gas then back out of the closeup.
Fly: morcana
Grable: frenic
Edith: ixiam
Now, zoom in on the stove itself. Click on the dial under the empty burner then click on the button to the left to ignite it. Finally, select the piece of paper you just got from your inventory to hold it to the flames. Sure enough, a hidden message appears. Write down what you see then click on the paper to put it away again. Click on the dial to turn off the stove then back out of the closeup. We’re done here so click on the doorknob to return to the hallway.
The door across the hall from you is George Crabtree’s room but we are missing several pieces of information that we need for it right now; we’ll be back to it a bit later. However, we do now have what we need to get into the locked room we skipped earlier. Turn left and click on the door knob to open the door. Go forward twice then turn right to face the door.
This door is locked. The key is in the door but it is on the inside. (So… How did the occupant get out?) Fortunately, we can get it.
Click on the lower part of the door for a closeup. Select the sheet of paper from your inventory. This slides the paper under the door. Next, select the screwdriver. The screwdriver is inserted into the keyhole, pushing the key on the other side out and causing it to fall onto the paper. Click on the paper to pull it out from under the door. Click on both the key and the paper to pick them up. Back out of the closeup and select the key from your inventory to open the door.
There is a lot of information in here. Start by going forward and turning to the left to face the desk. Click on the desk for a closeup. You should see a number of letters and clippings and a journal. Click on all of them to read them, especially the journal; it will explain most of what is going on.
In short, George Crabtree and his friend Arther Johnson were attempting to find out what happened to Tom Oliver, the missing soldier you read about in the book in the next room. Instead, they found a secret chamber below the hotel. There, they somehow released something; an evil entity that George refers to as the “Dark Fall”. Arther also found a sheet of vellum with twelve symbols on it that George later tore into sections and distributed among the hotel staff and guests. These are the symbols you have been finding. They learn that the symbols, which George calls “lyrics”, are key to destroying the entity.
Arther is killed in the war and George is left to carry on. He leaves to face his “Nemesis” and, apparently, never returns. All indication is that he failed.
There are several items to note in the journal. First, George mentions several “trials” and says that he hid the solution to one trial in a blanket. Note the order of the blocks in the drawing. He also says that one of the lyrics has been destroyed but that he knows of a way to find it again. Note the drawing on the page. As a side note, notice that several of the notes on the desk state that George is suspicious of Gloria Grable.
In the desk drawer there is a letter from an archaeological society hidden among several photographs but it doesn’t appear as if they ever became involved in the hotel. When you have finished reading all of the information here back out of the closeup.
Above the desk are several pictures that you can examine. If you do, you can click on the one on the left to look behind it, revealing the last few letters from Arther to George. You can read them if you wish. You can also check out George’s reading selections on the shelf to the right. When you are done with the desk, back out of any closeups then turn around to face the table behind you.
There are several things on this table; a “magic lantern” (an old-style slide projector) on the left, a box in the middle and several sheets of paper on the right. Start by clicking on the sheets of paper. Here you should find a photograph and a drawing of the monolith you found under the barn. The drawing shows the order in which you should have written the symbols from the monolith. You should also see a slide index; just remember it is here for now. Back out of the closeup.
Now, click on the box to open it then click on the switch to the left of the box to turn on the magic lantern. Click on one of the slides in the box to insert it into the lantern; the slide will be projected on the far wall. (Remove the slide from the projector by clicking on its edge where it sticks out the side of the magic lantern.) Look at all of the slides.
When you insert slide number 5 (top slide in the right compartment) notice the figure in the lower-left corner of the slide. He seems to be holding something. Click on him for a closeup. The item he is holding is showing one of the symbols from your list! Click on the papers for a closeup again then click on the slide index to discover that slide 5 is entitled “Mortym”. Write “MORTYM” next to the symbol on your list then back all the way out of the closeups. Turn off the projector by clicking on the switch (the slide gets put away automatically) then turn to the right.
Notice the trash can sitting beside the door. Click on it for a closeup then click inside of it several times until you see a number of scraps of paper. Drag them around with your mouse and assemble them like a jigsaw puzzle to reveal a note apparently written by George Crabtree. It seems that George released the entity from its confinement because he somehow thought that it could return Arther from the dead. Apparently, it didn’t. (Why does it never occur to anyone that whoever imprisoned these eldrich beings deep underground probably had a good reason for doing so?)
(There seem to be some inconsistencies in the story’s timeline. George Crabtree (and everyone else in the hotel) disappeared on the night of April 29, 1947. Arther Johnson died in December of 1944; over two years earlier. But the note in Arther’s room referenced Matilda Fly and Gloria Grable, neither of whom were in the hotel more than a few days and indications are that when George tore the paper with the symbols into pieces he gave one to Arther as well as the others. It is also unclear if George and Arther released the Dark Fall together or if George did it alone later. It is possible that George is not completely stable and is referring to Arther as if he was still around even after his death, which would explain some of the notes. Still, I found it a bit confusing.)
Back out of the closeup, go forward, turn left then go forward again. Click on the device in the corner for a closeup. This is a kinescope; an old-style movie projector. Click on the power switch to turn it on.
The “films” for the kinescope are the four black cylinders sitting in the box to the right. Click on one of them to insert it into the kinescope. Click on the crank to start the kinescope running then click on the eyepieces to view the film.
There are four films. Two are of “Possible Hauntings” and show orbs zipping around the hotel. One is a “Study of Local Trees”.
The fourth is titled “Trial 2 – Elements”. It shows, in order, a fire, lightning, clouds and the ocean. If you remember, George mentioned trials in his journal so note the four elements and their order.
When you are done, turn off the kinescope, back out of the closeup then exit the room. We’re done on this floor for now so go all the way back down the hallway and descend to the second floor.
Hotel – Second Floor
When you arrive on the second floor you are looking at room 2A so click the doorknob to enter. The first thing you should see inside is a pair of scissors stuck in the wall. No, I don’t know why. Turn to the right to face the room.
You can examine the empty wardrobe to the left but it seems to have no importance. Instead, examine the table to the right, between the two bed frames. There are two pieces of paper on the table, click on both of them to read them. One is a advertisement for the hotel dining room. Note the pattern on the table in the picture (and note that the dining room was designed by Arther Johnston). The other paper is a order ticket or bill from the dining room. Note that the order is for table 2.
(There is a Bible on the lower shelf on the table. You can pick it up but there doesn’t seem to be anything you can do with it. It looks like there is something stuck inside the bible but I was never able to pull it out or determine what it was. It doesn’t appear to have any importance.)
When you are done, back out of any closeup then turn to face the door. Click on the doorknob to return to the hallway then click on the doorknob of the door in front of you to enter room 2B.
This was Matilda Fly’s room. There are a couple of things to do here. First, turn to the left. Click on the table to the left to get a closeup and examine a flyer and program for the play “The Two Faced Bride of Bodmin Moor”. Matilda herself will talk to you when examine them, saying that it was “one of her best”.
Back out of the closeup and click on the table to the right of the bed. Click on the drawer to open it. There are a number of newspaper clippings inside that you can read. Well, based on the reviews, if “The Two Faced Bride of Bodmin Moor” was one of Matilda Fly’s best then I certainly wouldn’t have wanted to see one of her worst!
If you read through the clippings you will note that one of them also contains a story about a female bank robber known as “Slyfox”. Hmmm… Interesting.
Close the drawer when you are done with the clippings. (There is a book on a lower shelf that you can pick up but you can’t seem to do anything with it.) Back out of the closeups and turn to the right. Click on the desk for a closeup then click on the letters lying there. (Matilda pops in again to accuse you of being nosy; she’s fairly talkative for someone who is dead…) It seems that Matilda found something in the clippings quite interesting and seems to think that she will be returning home quite wealthy. Hmmm…
The letter also says that George Crabtree gave her a strange piece of paper and that she has hidden it somewhere in the room. That sounds like another of the symbols we have been looking for so let’s see if we can find it.
Click on the clock sitting on the desk for a second closeup. Matilda the talkative ghost will observe that it is a strange clock because it has buttons on it. Sure enough, there are four buttons on the base of the clock. If you click on them (starting on the left) you will notice that the third button makes a different noise from the rest.
Click on the third button then click on the first, second and fourth (in that order). This time all of them should make the different sound and a drawer should pop out of the side of the clock. Click on it to examine its contents and you should see another of the symbols.
OK, we have a symbol but we don’t have the word to go with it. Or, do we? Remember the paper written in invisible ink? On it, the word next to Fly’s name is “MORCANA”. So, write that word next to this new symbol on your list. Back out of the closeups, turn around and return to the hallway.
Turn to the right and go forward then turn left to face room 2C. Click the doorknob to go inside.
Inside, turn to the right. Click on the wardrobe on the left for a closeup then click on the door handle to open it. Click on the object you see inside for a closeup.
This is a box with an odd design on the top. If you click the various parts of the design you will notice that you can interact with them. The design may look familiar; it is the same pattern as the pattern of ink spots on the blotter down in the lobby.
Remember the sheet of paper with numbers that we moved over the inkblots? Click on the design elements on the box in the order indicated by the numbers and ink spots. In order, click on the upper-right disc, the bottom disc, the upper-left disc, the top-left dot, the top-right dot, the bottom-left dot and the bottom-right dot. The box should open. (If you make a mistake, as usual you can back out of the closeup then re-enter it to reset the puzzle.)
Inside you will find another symbol and a letter containing another word; “LUSSA”. Write the word next the correct symbol on your list. The letter is obviously from George Crabtree and talks about how the symbols have been hidden and how they are a means of “entrapment”. It also mentions how Arther has hidden some of the words “beyond the visible” and “exposed by flame”. This is a hint as to how to find the words that were written in invisible ink but we’ve already solved that part.
Close the box, back out of the closeup, close the doors then back out again. To the right of the wardrobe there is a table and sometimes there is a grey hat sitting there. Other times the table is empty. You can examine the hat when it is there but I never determined anything of importance about it or even if there is any pattern to its appearing or disappearing. At any rate, we are done in here so turn to face the doorway. You can turn the lights in this room on or off by clicking on the switch but I never discovered any reason for doing that either. Return to the hallway.
The next room is 2D which is where Nigel and Polly have set up their ghost hunting equipment. Unfortunately, the door is locked. Fortunately, we have the key. Select the key you recovered from the teapot from your inventory to open the door and go inside.
There is a lot to do in this room so let’s get started. First, click on the bulletin board above the table in front of you. Here you will find a note from your brother, several photos of Nigel and Polly (and a possible ghost!), a map of the area and takeout menus for three food places. Remember this for now but if you want to save a bit of time you might want to go ahead and write down the phone numbers for all three places. (The phone numbers are the chain of eleven digits that start with 01622.)
Back out of this closeup then click on the table itself. The only thing of interest here is the tape recorder. Click on it to pick it up then click on the top button to listen to a message from Polly. She tells you several pieces of information, including the fact that Nigel is gone and that they found something but think they have managed to seal it up. She says that they found something using the “Fermi Scanner” and that she has hidden the settings in the upstairs bathroom. (Those are the numbers we revealed by moving the mirror around.) She encourages you to read her journal before she leaves, apparently to meet her fate. When the message ends click on the recorder to put it back down then back out of the closeup.
Now, turn left to face the far end of the room and go forward. I know you are anxious to try out the two computers in front of you but there are a few things we should do first.
Turn to the right then click on the bulletin board for a closeup. There is a lot of information here. Examine the picture on the top left. Here we have another of the symbols and its corresponding word; “LARSUS”. Write down the word next to its symbol. (This symbol is actually in one of the bathrooms back down on the platform, the ones I told you to ignore at the very start. You can easily see the symbol there but finding the word is a slight find-the-hotspot hunt and it is much easier to just wait and get it here since you have to come here anyway.)
The note on the top right is a list of those people who vanished on April 29, 1947. The note below it gives all the locations where Nigel and Polly have set up their cameras. Note Nigel’s mention of a password and how it is “the only thing I like on that menu”. Remember this.
Look at the rest of the bulletin board items if you wish then back out of the closeup and turn back to the left. (If you didn’t write down the phone numbers from the takeout menus you should go get them now then return to this location.) Click on the pizza box sitting to the left of the computer terminals for a closeup. There is a cell phone sitting next to the box. Click on it to pick it up.
Now, call the three restaurants. Carolina Chicken demands to know why you haven’t paid for your last order so you just hang up on them. Shimla Tandoori is closed.
When you call the Dragon Inn you get an automated system that asks if you want to repeat your last order. Indicate that you do and you will be told that they are repeating your order for “number 15” before telling you that they are closed too. Hang up, then go examine the menus again. You will find that item 15 on the Dragon Inn menu is “chicky chow”. (Yum-yum!) Write this down then return to the computer terminals again.
Click on the left terminal first. There is a tremendous amount of information on this computer and if you are interested in the story then you should take the time to read all of it. Information on Nigel and Polly’s investigations, background information on the people who disappeared, photos and sound recordings… a total treasure trove. All of it is interesting but if you just want to get on with the game there are only a few bits that are necessary and they can all be accessed through the “Web Browser”. (That’s the second icon from the bottom on the left-hand side toolbar; what kind of operating system are they running here anyway?)
The only web sites you can get to are the ones in the “Recent” list. If you can’t read music or don’t know the piano then you should select the “www.learn_piano.co.uk” entry. This will tell you how to read the music you found in Betty’s room upstairs and how to play it on the piano. If you want to play with the Ouija board in the attic you should select the “www.ghosthunters.netz” site, click on the “In Focus” button then on “Polly’s Ouija Tips”.
There is a fourth “Recent” site that only appears if you first go to the “www.20thCenturyMysteries.com” site. When you do, a “www.the_seeker.pagan.org” site appears on the list. It doesn’t seem to have any additional relevant information though. (The “20th Century Mysteries” site itself has a short article on the disappearance of Matilda Fly.)
When you have finished with this terminal, close any applications you are in then exit by clicking the Omega icon in the upper left. Now select the right terminal. Enter “chicky chow” for the password. After a few seconds you will get a display showing all of the feeds from the cameras that Nigel and Polly have set up around the hotel.
Look through all of the cameras if you want (click on the small images on the top of the display to select a camera; some of them are interesting if nothing else) but the only one of major importance is the very last one on the far right. This is the “Fermi Scanner” that Polly mentioned on the tape recording.
Note the four entry fields. Set the values to the numbers we found in the third floor bathroom; alpha 00:20, beta 00:90, particle 00:05 and density 00:40. When you get close the scanner will “zoom” in on an area, report that there is an opening behind it and suggest a manual investigation. We’ll get there in a bit; right now you just need to remember that the scanner is in the cellar.
We’re about done with this room. Exit the screen then log out of the computer. Back out of the closeup and turn to the left. Here are the boxes that all of the equipment came in. (There is a packing list on the top of one of the boxes if you are curious as to what all is here.) Look at the far right of the screen, between the boxes and the wall. Examine the object there. This is a set of electromagnetic goggles that will let you see things you ordinarily couldn’t. Click on them to add them to your inventory.
Now that you have the goggles you will occasionally hear a voice whisper “Here” whenever you enter an area or turn to face a new direction. When you hear this it means that there is something in the area that can be revealed by the goggles. Select them from your inventory to see what is there.
Back out of any closeups then turn to the left to get your first demonstration of this. Select the goggles and pan them around the screen to read a message that has be left for you by… something. (There are quite a few of these messages floating around. I thought the X-Files poster was a nice touch, btw…)
We’re done with this room so go ahead and exit. Once you are back in the hallway turn to the right and go forward. Turn left to face room 2E and click on the doorknob to enter Andrew Verney’s room.
Directly in front of you near the bottom of the screen you should see two boxes. Click on them for a closeup then click on the reddish book in the left box to pick it up. You should see Sights of the Northern Hemisphere by Andrew Verney (Second Edition). Click on the book to read the flyleaf where we learn that Verney’s real occupation is designing board games and puzzle boxes. Guess we know where that strange box in 2C came from. Click on the book to close it then click outside the book to put it down.
You can look at the blue book as well if you want but you can’t read it.
Now, click on the right box for another closeup. You should see a number of paper scraps lying on the bottom. You can drag these around with your mouse to attempt to assemble them like a jigsaw puzzle. If you do, you can see they are where Verney was attempting to solve the code in which George Crabtree apparently wrote several of his notes. We’ve already solved it but this would have given us some help if we had been really stuck.
Back out of both closeups then turn around and exit the room. There is more to do here but we need to do something else first. Don’t worry; we’ll be right back.
For now, enter room 2F across the hall. Turn to the left then examine the old chest of drawers in the back. Examine them a second time to see a digital camera sitting on the floor. Click on it for yet another closeup then click on the camera to pick it up. Click on the green button to turn it on. Click on the up or down arrows to scroll through the pictures. (Clicking anywhere else on the camera puts it back down.) There is nothing special about the pictures except a few of them show some statues that we haven’t seen yet.
When you are done, put the camera down and back out of all the closeups. There is nothing else to do here so just back out of all the closeups then leave the room. Once back in the hallway, turn to the right and go forward then turn to the left.
Click on the telescope to examine it then click on the eyepiece to look through it. You can pan the view around and look at various star patterns. As you do, a voice (presumably the ghost of Andrew Verney) will point out the constellations as you pass over them. Keep looking around until you find one that causes Verney to comment “Brighter than the rest… I don’t recognize it at all!” Note the shape of this particular constellation then back out of the closeups. (Note: Verney won’t say anything unless you have been in his room and read his book to learn of his interest in astronomy.)
While we are here we may as well check the bathroom. Click on the door to the right of the telescope to enter. There, click beneath the sink to get a closeup of a box. Click on the box to open it. Click on it again to get a closeup of its contents.
If you look carefully, you should see something stuck to the underside of the lid. Click on it to examine it. You should see what looks like half of a photograph showing some runes on a table. The runes are labeled “sandstone” and “wood”. Note their locations relative to the markings on the table then click on the photo to put it back down and back out of the closeups.
Turn to the right. Click on the old-style hot water heater at the end of the tub for a closeup then click on the grille to open it. Click on the papers you see inside to find a note from Gloria Grable to Matilda Fly. It seems as if Grable and Fly had completed some sort of transaction that Grable wished to keep secret. Note that George Crabtree apparently gave Grable a symbol as well. When you have finished with the note click on the grille to close it again then back out of the closeup. Turn right to face the door then click on the knob to exit.
There is a storeroom off to our left but it has nothing of interest to us. (There is a “broken” slot machine in there that occasionally produces slips of paper containing various quotes in response to pulls of its lever but none of them seem to have any relevance to the game or story.) So, go forward and turn right then re-enter room 2E.
Inside, turn to the right and go forward. There are quite a few things in this area but let’s start by clicking on the wardrobe to the right. Click on the large, dark-blue cylinder sitting in the corner to reveal a star chart. Examine the constellations on it and find the same one you found while looking through the telescope; the one Verney didn’t recognize. It’s the one at the bottom left labeled “Raka”. Remember this word. Click on the star chart to put it back down.
Now, click on the brown piece of paper to pick it up then click on it again to read it. Note the pattern of dots and the numbers beneath them. Click on the paper again to put it back down.
You can look at the other star charts here if you like but none of them are particularly relevant. When you are done, exit the closeup.
Click on the drawer cabinet in front of you (not the box on top of the cabinet). Click on the drawers to open and close them. In the third drawer you should find a book; click on it to pick it up. This is Mapping an Alternative Sky, also by Andrew Verney. Click on it to read it.
The first pages contain lists of constellations and numbers. Look up Raka, the constellation we just found, and note the numbers associated with it; 12/534/76. Write these down.
Now, click through the rest of the book to read it. Note that Verney is very excited to find a new constellation and also that George Crabtree has given him a coded note and a symbol as well. You also learn that Verney didn’t believe in ghosts. I wonder if he does now?
When you are done with the book click outside of it to put it back down then close the drawer and back out of the closeup.
Andrew
TFZIW GSV HPRM DRGS BLFI ORUV!
R PMLD R HLFMW ORPV Z NZWNZM. VWRGS RH UVVORMT RMXORMVW GL KSLMV GSV KLORXV… BLF NFHG GIFHG NV. GSVIV RH Z TIVZH VERO DRGS FH SVIV RM GSV SLGVO. NB IVHVZIXS RH TLRMT DVOO. R QFHG MVVW GRNV.
Your trusting friend, G.C.
P.S. WL MLG LKVM BLFI WLLI GSRH MRTSG GL ZMBLMV.
Andrew
GUARD THE SKIN WITH YOUR LIFE!
I KNOW I SOUND LIKE A MADMAN. EDITH IS FEELING INCLINED TO PHONE THE POLICE… YOU MUST TRUST ME. THERE IS A GREAT EVIL WITH US HERE IN THE HOTEL. MY RESEARCH IS GOING WELL. I JUST NEED TIME.
Your trusting friend, G.C.
P.S. DO NOT OPEN YOUR DOOR THIS NIGHT TO ANYONE.
Click on the box on the top of the cabinet for another closeup. Click on the note under the box to read it; this is the coded note from George Crabtree that Verney mentioned. Verney never solved the code but fortunately we already have. Once again we learn that there is something evil loose in the hotel and the symbols are somehow important.
Click on the note to put it away. Now look at the box. Notice the row of buttons along the bottom? You should realize that the arrangement of buttons looks like the drawing we found in the bottom of the wardrobe, which should also look strangely similar to the lists of numbers associated with the constellations in Verney’s notebook.
Number the buttons from 1 to 7 starting on the left. Now, remember the numbers associated with Raka; Verney’s new constellation? Push buttons 1, 2, 5, 3, 4, 7 and 6. The box should open, revealing a piece of paper containing another symbol. Notice how much this symbol resembles the constellation Raka? Label this symbol “RAKA” on your list.
And we’re done for here. Back out of any closeups and exit the room. Once in the hallway, turn right then go forward all the way down the hallway and down the stairs to the first floor.
Hotel – First Floor
When you arrive you should be facing room 1A, which is partially opened. Enter it then turn to the right. You should hear the whispering “here” voice. Select the goggles from your inventory and look around the room. You should see a bed against the right wall with an oddly decorated bedspread. You have probably noticed a few symbols similar to those on the bedspread scattered about.
If you remember George Crabtree’s journal, he said that he had hidden the solution to the first “Trial” in a bedspread. Click on the bed for a closer look. Note that the bedspread is divided into four parts; each part a different color. Note the colors of each part in the order in which they were numbered in the journal; Green, Blue, Purple and Red. Back out of the closeup and turn to the right (which automatically puts away the goggles) then go forward to return to the hallway.
There is nothing in the room in front of you except for some graffiti on the wall (copies of some symbols you have probably already seen and the phrase “leave me alone” written backwards) so we’re going to ignore it. (There was a photo of the graffiti on one of the bulletin boards in Nigel and Polly’s room, making this the second room you can skip completely because of their photos.) Turn to the left and go forward. The room to your left is also completely ignorable. (You can use the goggles to see some more old beds but that’s about it.) Instead, turn to the right and click on the doorknob to enter. This is room 1D where Thomas Callum was secretly staying.
Directly in front of you is a desk. Click on it for a closeup. Examine the letter to read a note Thomas had apparently written for Betty; looks like he never got to deliver it. If you click on the “Death” tarot card lying on the desk it will briefly turn into a joker.
Back out of the closeup and turn to the left. You can examine the lamp lying on the floor but that’s about it. There is nothing else in this room so just return to the hall.
Turn right, go forward then turn left to face room 1E. Click on the doorknob to enter.
Directly in front of you there is a painting on the wall. Click on it to examine it then select the lantern from your inventory to illuminate it. You will hear Gloria Grable complain a bit. The painting doesn’t seem to have any significance though.
Back out of the closeup and turn to the right. You will hear the “here” voice so select the goggles. The entire room is suddenly illuminated with the greenish “goggle vision” and a swarm of orbs will fly from a point on the floor. Click on that point to examine it then click on the floorboard. It will move to one side. Click in the opening to examine its contents.
The opening is mostly full of money though we are more interested in the two pieces of paper on the right. One is another symbol while the other is yet another note from George Crabtree, this one to Gloria Grable. The note contains the word “FRENIC” so write that next to the latest symbol on your list. (We also saw the word FRENIC associated with Gloria Grable on the list of names written in invisible ink.)
Back out of the closeup, click on the floorboard to put it back in place, then back out of any remaining closeups. The “goggle vision” effect will end.
(In case it has not become obvious, “Gloria Grable” is also the bank robber known as “Slyfox” (who you learned about from the newspaper clipping in Matilda Fly’s room). Fly had apparently figured out who Grable really was and was blackmailing her. When you activate the goggles in this room you can actually talk to Grable. Well, her ghost anyway. Type in your questions and click on the “Say” button at the bottom of the screen. She really doesn’t have that much to say though. Be sure to talk to her before examining the floorboard because the goggle effect ends when you exit the closeup.)
At any rate, we are done here. Return to the hallway. The door in front of us leads to room 1E but it contains nothing of importance. (There is another of Nigel and Polly’s cameras in there and a thermometer in a drawer. The thermometer changes temperatures from time to time but that’s about it.) Instead, turn to the left and go forward. Examine the portrait in front of you to learn that it is Henry V. (Odd decorating scheme in this hotel…) Back out of the closeup.
Turn left again. The door directly in front of you leads back to the station platform. Remember, back where we left the platform and went into the woods, there was a flight of stairs that I said led into the hotel? This is where it leads. We have no need to go back out there so instead click on the door in the right wall to go into the first floor bathroom.
Directly in front of you is a sink. Click on it for a closeup. Click on the right faucet to turn it on. Now, wait several seconds. After a bit, hot water will start running into the sink. Condensation will form on the mirror, revealing a symbol and another word; MALUS. Write this word next to the symbol on your list.
Turn around and exit the bathroom. There is another storeroom to our left but there is literally nothing of interest or importance inside. We’re done on this floor but we still have that one room we skipped up on the third floor and we now have everything we need for it.
Go forward three times then turn left to face the stairs. Go forward to climb to the second floor. Go forward once and turn right to face the next set of stairs. Go forward to climb to the third floor.
Hotel – Third Floor (Again)
Go forward once again and turn right to face room 3B; George Crabtree’s room. Click on the knob to enter.
On the shelf in front of you there are two books on alchemy; you can read them if you want but really aren’t necessary. Instead, turn to the right.
There are several points of interest here but start by clicking on the right bedpost on the foot of the bed. When you get the closeup, click on the knob on the top of the post; it will unscrew and reveal a hidden note. Click on it to read George Crabtree’s last words before he set out to face the entity.
When you are done, back out of the closeup and click on the bedside table near the center of the screen. You can’t do anything with the books on the top but you should see a box sitting on a lower shelf. Click on it for a closeup.
This is another puzzle box, this one with three portraits on it. You should recognize the portraits as being the same as those at the end of the hallway on each floor.
You may (or may not) recognize the first portrait as that of Henry VIII. Click on the number below the portrait until VIII is showing. The second portrait you should recognize from the first floor hallway as being of Henry V. Click on the number below this portrait until it reads V. Leave the third portrait showing I. The box should open.
Inside there is a note from George Crabtree. He is upset because one of the symbols has been destroyed. But, he thinks there is a way he can see the symbol again.
There is also part of a photograph inside the box. This is the other half of the photo you found in the second floor bathroom. Again, note the positions of the symbols in the photograph. When you are done, back out of the closeup.
Finally, click on the low table you see in the lower-left corner of the screen. When you get the closeup, you should recognize the table and the items on it as being the ones from the torn photograph.
We need to reproduce the arrangement of the tokens as shown in the photograph. Each token is placed on the chalk lines at a point where the lines cross each other. You can drag the tokens around with your mouse. Place the wood token (the large, brown one) to the right of the bowl and just above the center. Place the chalk token (the white one) below the bowl and just to the left of the center.
The bronze token (the smallest, yellowish one) goes to the right of the bowl and just below the center. Finally, place the sandstone token (the remaining, yellow token) above the bowl and to the left of the center. Remember, the tokens must be placed at the points where the chalk lines cross each other. (Actually, the sandstone token seems to go a bit to the left of the crossing.) If you have placed everything correctly then the tokens will fade out and a stream of words will cross the bowl. You will see one of the symbols followed by its name; “OLKAS”. Write this name down next to its symbol.
We have now found 11 symbols and their corresponding words; there is only one symbol that we have as of yet not found the “lyric” for. And, we actually don’t need to find it. Remember the list of names and words written in invisible ink? The word next to Betty’s name was “Tyma”. We haven’t found Betty’s symbol yet but since there is only one symbol left on our list with no lyric attached that must be it. Write “TYMA” next to the last remaining symbol.
Are we done? Not quite but it is pretty much all downhill from here. Back out of any closeups, leave the room and go all the way down to the ground floor again.
Hotel – Ground Floor (Again)
Ignore the annoying phone, go all the way down the steps and turn completely around. Go forward and to the right of the steps (not up the stairs again) then turn to the right. Ahead of you on the left is the door to the bar. We really don’t need to go in there; it’s where you find Betty’s symbol and we just figured that one out on our own. But, for completeness sake, we’ll go get it anyway. (If you don’t care, feel free to skip ahead.)
The door is locked so select the bar key from your inventory to open the door. Once inside, go forward, turn right then go forward again. Turn to your left and examine the piano. Examine it again for a closeup of the keyboard.
Remember the sequence of five notes we got from Betty’s room? We need to play them on the piano. One of the web sites we looked at on Polly’s computer told us how to play them but if you don’t remember, start by running your cursor over the keyboard. You will notice that there are only seven keys you can actually interact with. (The cursor may appear as the pointing finger on others but there are only seven that you can actually press.) Number these 1 thru 7 (starting on the left) then press keys 2 – 2 – 3 – 4 – 5. You will automatically leave the closeup and a piece of paper will appear on the piano. Click on it for a closeup of Betty’s symbol. From the invisible ink note we know that Betty’s symbol is named “TYMA” so write that down next to her symbol on your list.
Click on the symbol to put it away. Back out of any closeups then turn left. Go forward, left and forward again to reach the door. Click on it to return to the hallway. (There are a couple of places in the bar where the “here” voice shows up so feel free to look around inside before you leave. There is a copy of “The Ballad of Tom Oliver” on the wall of one room too.)
Back in the lobby, there are a pair of restrooms to your left. There is nothing of major importance in either but the women’s room contains one of the best “jump” moments in the entire game so feel free to check it out. (Look around for a flickering light and watch the shadows carefully.) For now though, turn to the right. Straight in front of you there is a hard-to-see door under the stairs that leads to the cellar. We aren’t going there quite yet but remember where it is; I’ll be telling you to come back here in a moment. Instead, turn to the right again, go forward then turn left to face the door into the kitchen. Click on the doorknob to go inside.
There are all kinds of things to look at in the kitchen but most of them are irrelevant. Turn to your left and examine the table. Click on the Complaints Book to see a picture of Edith drawn by Arther. (Wonder what his complaint was?) Back out of the closeup and turn back to the right.
Go forward. Examine the shelves to the right. Examine the top shelf (the one with the two boxes labeled “OXO”. Click on the note between the two OXO boxes to read it. The front page isn’t important but click on it again to flip it over and read a request to burn the complaints from “that actress”; presumably Matilda Fly. Back out of the closeup.
Well, where would you burn something in a kitchen? Turn to the right to face the stove. Click on the bottom portion of the stove for a closeup. There are two “drawers” on the bottom of the stove; one on the left and one on the right. Pull out the left drawer and read the paper scrap you find there. Then, pull out the right drawer and read the scrap there. (You have to close one drawer before you can open the other.) Hmmm… It seems Matilda Fly was sitting at table 1 but didn’t like it. She was moved to table 3 but had problems with it as well, causing her to eventually be moved to table 4. Note that table 1 is near the doors, table 3 has a flickering lamp and table 4 is near a window. Close the drawers and back out of the closeup.
Turn around and go through the door in front of you into the dining room. It is not immediately obvious but your goal in here is to determine the number of each table and to match that with the pattern on the table top.
Start by examining the table in front of you. Remember the advertisement we found in room 2A, the one for the hotel restaurant? The pattern on the table in the ad matches the table in front of us. The bill we found with the ad indicated that it was for table 2 so sketch the pattern on this table as well as you can and label it “2”.
Turn to the right and go forward. In front of us is a window so one of the two tables next to us must be table 4. Turn to the left.
Well, this table is labeled and it isn’t 4. This is table 3. (Look under the table and click on the lamp there to see it flicker, confirming that this is table 3.) Sketch the pattern on this table and label it “3”.
Now turn around. This must be table 4. Sketch this pattern and label it accordingly. Also, notice that the “here” voice has shown up again. Select your goggles to hear Matilda Fly and “Gloria Grable” making their deal. (And I usually don’t say anything about the voice actors in adventure games, but that had to be one of the worst reads I have ever heard. No wonder “The Two Faced Bride of Bodmin Moor” got the reviews it did…)
Turn to the right and go forward twice. We are now near the doors and between tables 1 and 5. It should be obvious but table 1 is to our right and table 5 to our left. Examine each table and sketch the pattern on each. (One of Nigel and Polly’s cameras is sitting on table 1.) When you are done, make your way back out of the dining room and through the kitchen to the lobby again and go face the door into the cellar (the door under the stairs I pointed out earlier). Click on the door to enter.
Hotel – Cellar
Turn to the left and go forward. In front of you is a door but it is locked and we don’t have a key. (There is also an axe in front of you that you can examine. Why are there always axes in haunted buildings?) Turn to the right and go forward then turn completely around.
Notice the odd panel in front of you? The symbols on the panel should look familiar; they are the patterns from the tables in the dining room. To open that locked door, you need to select the patterns from the tables in order. You should have these (you just sketched them, after all).
Number the buttons from 1 to 6 starting at the top. Click on patterns 3 – 2 – 5 – 1 – 4 (which matches tables one thru five). Go forward, turn right and click on the doorknob. The door should open and you should find yourself in George Crabtree’s darkroom.
There are a couple of things of interest in here but the only essential item is directly in front of you. Click on the base of the shelves in front of you for a closeup then click on the cabinet doors to open them. Click on the item inside the cabinet to add it to your inventory. Click on the doors to close them again then back out of the closeup.
Now, turn to the right. In front of you is a work table and you can click several parts of it for closeups. The interesting part is to the left where you can examine several pictures that George Crabtree took of some of the hauntings in the hotel and a note from Nigel discussing them. When you are done looking at the pictures, back out of any closeups, turn to the right and click on the doorknob to return to the cellar.
Go forward twice and turn to the left. In front of you is another of Nigel and Polly’s camera setups. This is the one with the Fermi scanner attached; the one that showed a hollow space when you entered the proper values on the computer in their room. Click on the wooden debris the camera is aimed towards to move it to one side, revealing an opening. (If you had not set the scanner properly from the computer then you would not have been able to move the wood.) Click on the revealed opening to enter it.
It’s dark so select the lantern from your inventory to turn it on. Examine the markings on the wall that are revealed by the lantern for a closeup. You should recognize the cornerstone dated 1318 from the sketch in George Crabtree’s journal. Notice the socket to the right of the date. Select the T-shaped object you just got from the darkroom from your inventory to insert it into the socket. Click on it to cause one of the foundation stones to move aside, revealing another opening. Take a deep breath and enter the opening.
Ancient Temple
Well… As the saying goes, we aren’t in Kansas anymore! Look around if you like to see the various symbols that you have become familiar with glowing in various places on the wall, but our priority is to get to the other end of the tunnel. Try to go forward and you will find your way blocked by a set of glowing symbols. This is the first of the “trials” mentioned by George in his journal. Fortunately, he had solved the trial and left the solution hidden in the pattern on a blanket.
Remember the bedspread we saw using the goggles in Room 1A? It contained four blocks of color; green, blue, purple and red. Click on the symbols in front of you in that order. That’s the bottom, right, left and top symbols. You will hear voices naming the symbols in an unknown language as you click on them. When you have clicked on all four symbols, they vanish. Go forward down the tunnel.
If you try to go forward a second time, another set of symbols appears and blocks your way. This is the second trial. George left us the solution to this one too, on one of his kinescope rolls in room 3F. That kinescope showed four “elements” in order; fire, lightning, sky and water.
Make sure you have your sound turned on and the volume up at this point. If you click on each of the symbols you will hear a sound associated with each of the four “elements” above; the crackling of a fire, a burst of thunder and so on. Click on each of the symbols in the order of the elements from the kinescope. That’s the top, left, right and bottom symbols. The symbols vanish allowing you to go forward again.
On the ground in front of you there are several objects. Click on them for a closeup. Click on the book to read it. This is George Crabtree’s final journal. Apparently this is where he fell; his task unfinished. So, it’s up to us to finish what he started; to destroy the Dark Fall and free the spirits of those it has kept captive for so long.
Back out of the closeup and attempt to go forward. Another set of symbols appear, this time containing five symbols. This is the final trial. Click on each of the symbols to hear a sound. Unfortunately, George apparently never passed this trial and so didn’t leave us the solution. So, we’ll have to figure this one out on our own.
Turn to the left. Notice the spot on the wall that is glowing? Click on that spot. Watch the display and listen to the sounds that are made. They should remind you of the sounds the symbols made when you clicked on them.
You need to click on the symbols to recreate the sounds you just heard. Turn back to the right and click on the symbols in the order top, bottom-left, bottom-right, center and left. The symbols disappear and you can go forward again. This takes you to the end of the tunnel. This is the last chance you will have to save your game so do so before going through the archway in front of you and into the temple proper.
This is it. Look around if you like but we are really here for only one reason; to put the Dark Fall to rest. Finish looking around and turn to face the “well” in the center of the chamber. Notice that your “Say” bar has become active.
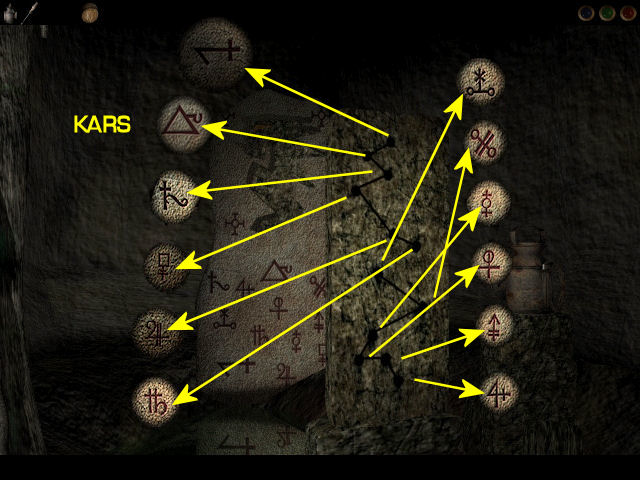
We now need to say the twelve “lyrics” in the proper order. Type in each word from your list and click on “Say”. You should have the list but if you don’t the lyrics and their order are LUSSA, KARS, OLIVIAK, FRENIC, MORCANA, TYMA, MALUS, LARSUS, OLKAS, MORTYM, IXIAM and RAKA. (Notice that you have to delete each word after you say it before you can type in the next.)
As you enter each word you hear voices repeat it. After the twelfth word, the energy display above the “well” stops, as does the energy flow from each of the statues. The statues slump then disappear. Orbs shoot from the well and voices echo around the chamber as they fly through an opening in the roof to freedom.
The final orb stops to talk to you. It is Timothy Pike, who thanks you for what you have done and tells you that he is going home. Well, not home, but “you know what I mean”. He then mentions your brother and makes the odd comment that things didn’t have to turn out the way they did. “You’ll see what I mean” he says, before flying off through the opening. Surprisingly, you find yourself flying through the opening moments later.
You then hear the original call for help from your brother again. As he speaks, you see the evidence of the haunting vanishing. Photos of ghosts change to show ordinary, empty rooms. Newspaper clippings of disappearances vanish. Even the framed “Ballad of Tom Oliver” from the wall of the bar fades away. Your brother loses his train of thought and, strangely, can’t remember why he called you. Obviously, it wasn’t very important. His job is going well and, after promising you a drink when he gets back, he hangs up. The Dark Fall is gone and, with it, all evidence that it had ever existed.
And so, the world is saved once again! Roll the credits.
Final Thoughts
Dark Fall is one of the best horror-themed adventure games I have played in a long time. The atmosphere and theme are excellent and there are several really good “jump” moments in the game. But, I have one or two nagging questions.
First, I am not totally sure of what the ending means. The implication is that everything has gone back to how it would have been if the Dark Fall had never been freed. Unfortunately it isn’t clear as to why this would have happened. Still, that is the only explanation I can come up with for why the photos and other evidence changed or vanished at the end.
I am also uncertain as to what the status of the player was supposed to be. From your initial appearance in the train tunnel to the ending it is not exactly clear what is supposed to be going on. Is the player dead too? The fact that you “fly” off through the opening with the other freed spirits would imply this, along with that odd start location in the train tunnel and things like the fact that you never see yourself in any of the mirrors in the game. (Didn’t catch that, did you?) On the other hand, you also pick up various items, carry them around and use them. So, who knows?
None of this should detract from the game though. Dark Fall is still a great fun game. Hope you enjoyed your tour.
Leave a Reply